| Weight | Gauge | Needle(US) |
|---|---|---|
Fingering
|
7.5 sts = 1"
|
0 to 1
|
4-Ply
|
7 sts = 1"
|
2 to 3
|
Sport
|
6 sts = 1"
|
4 to 5
|
DK
|
5.5 sts = 1"
|
5 to 6
|
Worsted
|
5 sts = 1"
|
6 to 7
|
Aran
|
4.5 sts = 1"
|
7 to 8
|
Chunky
|
3.5 sts = 1"
|
10 to 10.5
|
Bulky
|
2 sts = 1"
|
11 or over
|
Tuesday, 14 January 2014
Yarn Gauge Chart


Monday, 30 December 2013
Trio of Snowmen

12 x 16 "
A late Christmas present.....
Same technique used as below but just used a bigger frame so the panel would fit....
Had this project in mind since the summer........ Finally brought it to life.....Very inexpensive & easy if you like hand sewing like I do.... Found the perfect material.... There were 6 small panels for $7.00.........Use various colours of thread... metallic red and metallic green.. Buy an 8 X10" canvas art frame... I paid $3.00 for mine at Len's Mill where I also purchased the material.... Take a roll of cotton batting(very inexpensive but I forget how much) and cut 3 separate pieces. Cut two the exact size of picture but cut the third one so it will wrap around the frame on all sides and it will also hold the other two pieces in place... Staple these pieces all together on the frame(front)...Then take your chosen material and cover all over making sure the sides are covered... When the picture is exactly where you want it, staple it to the back as well....(I pinned mine in place to make sure the material didn't shift)... Do the corners neatly...... Begin to stitch the picture as you wish making sure you stitch into the canvas too.... Pull tightly until puffiness appears..... I had no trouble at all pulling my quilting needle through the canvas, the batting and material....I used a finger tip protector(Staples).. It acts as a thimble & helps grip the needle...When stitching is completed cover the back with another piece of cloth by stapling or gluing... This will cover your threadwork on the back side...
I call this quilting for non quilters.... If you would like to make one of your own & need some help feel free to email me marilynw@rogers.com
Same technique used as below but just used a bigger frame so the panel would fit....
Had this project in mind since the summer........ Finally brought it to life.....Very inexpensive & easy if you like hand sewing like I do.... Found the perfect material.... There were 6 small panels for $7.00.........Use various colours of thread... metallic red and metallic green.. Buy an 8 X10" canvas art frame... I paid $3.00 for mine at Len's Mill where I also purchased the material.... Take a roll of cotton batting(very inexpensive but I forget how much) and cut 3 separate pieces. Cut two the exact size of picture but cut the third one so it will wrap around the frame on all sides and it will also hold the other two pieces in place... Staple these pieces all together on the frame(front)...Then take your chosen material and cover all over making sure the sides are covered... When the picture is exactly where you want it, staple it to the back as well....(I pinned mine in place to make sure the material didn't shift)... Do the corners neatly...... Begin to stitch the picture as you wish making sure you stitch into the canvas too.... Pull tightly until puffiness appears..... I had no trouble at all pulling my quilting needle through the canvas, the batting and material....I used a finger tip protector(Staples).. It acts as a thimble & helps grip the needle...When stitching is completed cover the back with another piece of cloth by stapling or gluing... This will cover your threadwork on the back side...
I call this quilting for non quilters.... If you would like to make one of your own & need some help feel free to email me marilynw@rogers.com
Wednesday, 11 December 2013
Head Band for Quinn (18 mo)

Saw these little head bands in Michaels & I thought immediately of making a winter head band for our dgd.... I had some boa yarn hanging around looking for a home & it turned out so cute imho.... I crocheted into each little square by folding over the headband onto itself.... It is hard to explain but it is easy to figure out.....I tried crocheting into every other hole but it lost it's elasticity.. I used a 5.5 mm crochet hook....
Sunday, 24 November 2013
Christmas Gift & Card Combined

Next one I will position lower so I can quilt the Chef's Hat

In The Mail Today ~ December 1, 2013


Begin to stitch the picture as you wish making sure you stitch into the canvas too.... Pull tightly until puffiness appears..... I had no trouble at all pulling my quilting needle through the canvas, the batting and material....I used a finger tip protector(Staples).. It acts as a thimble & helps grip the needle...When stitching is completed cover the back with another piece of cloth by stapling or gluing... This will cover your threadwork on the back side...
I call this quilting for non quilters.... If you would like to make one of your own & need some help feel free to email me marilynw@rogers.com
Friday, 15 November 2013
GingerBread Wallhanging ~ A Christmas Project

Had this project in mind since the summer........ Finally brought it to life.....Very inexpensive & easy if you like hand sewing like I do.... Found the perfect material.... There were 6 small panels for $7.00.........Use various colours of thread... I used white, brown, metallic red and metallic green..... Buy an 8 X10" canvas art frame... I paid $3.00 for mine at Len's Mill where I also purchased the material.... Take a roll of cotton batting(very inexpensive but I forget how much) and cut 3 separate pieces. Cut two the exact size of picture but cut the third one so it will wrap around the frame on all sides and it will also hold the other two pieces in place... Staple these pieces all together on the frame...
Then take your chosen material and cover all over making sure the sides are covered... When the picture is exactly where you want it, staple it to the back as well.... Do the corners neatly......
Begin to stitch the picture as you wish making sure you stitch into the canvas too.... Pull tightly until puffiness appears..... I had no trouble at all pulling my quilting needle through the canvas, the batting and material.... I used a thimble which really helps.....When stitching is completed cover the back with another piece of cloth by stapling or gluing... This will cover your threadwork on the back side...
Gave this to my mother who is in an assisted living facility....
Wednesday, 25 September 2013
~~ Splendour in the Grass ~~
 What though the radiance
 which was once so bright
 Be now for ever taken from my sight,
 Though nothing can bring back the hour
 Of splendour in the grass,
 of glory in the flower,
 We will grieve not, rather find
 Strength in what remains behind;
 In the primal sympathy
 Which having been must ever be;
 In the soothing thoughts that spring
 Out of human suffering;
 In the faith that looks through death,
 In years that bring the philosophic mind.
Friday, 20 September 2013
Thursday, 19 September 2013
Tammy's Blankets

Tammy's Carter Blanket

Jax Blanket ~ love the blocks of Jax

Tammy's New Blanket for baby Paris Brooklyn Kolfage

She even has the Sorority House in this one, Alpha Phi
Washburn at the top

~Neice's Family~

This blanket is the same one as above but Tammy outlined all the names & pictures.... It looks so terrific.,,
A lot of work but well worth the effort...

~Tiger Face~
Take a look at Tammy's beautiful blankets... She uses my dishcloth patterns & uses double stranded, acrylic yarn....This makes the pictures stand out so well & she says they knit up very fast... I love the borders she puts on them.... She also knits blankets for veterans.... What a wonderful idea.... You are so creative, Tammy....
Please note: Tammy used Red Heart acrylic yarn... I used Bernat acrylic but could not get the same results.... Went to Michael's this morning & on holding Bernat & Red Heart ww yarn, Bernat is definitely thicker... Next time will buy some Red Heart....
Please note: Tammy used Red Heart acrylic yarn... I used Bernat acrylic but could not get the same results.... Went to Michael's this morning & on holding Bernat & Red Heart ww yarn, Bernat is definitely thicker... Next time will buy some Red Heart....
Tuesday, 27 August 2013
Wall Art 2013

I bought a panel of material with the fairy and the rose on it.....plus another white piece to lay underneath.... I bought two large artist panels & attached them together with two large screws so they would not separate....I placed the while cotton panel on this & stapled it to the back... I then took the picture panel, centred it & stapled it to the back..... The panel didn't quite cover at the sides so I took another small piece of cotton & stapled it evenly on the sides & folded it over to give it a nice edge...I ironed the material first & folded it in half to make a straight edge....I then ironed the material on the canvas border to make sure it laid down & brought it around to the back & stapled again....My art was ready to hang in about 1/2 hour.... Total cost of all material was $40.00....
Since this picture was taken I painted the wings with MS glitter paint.....Love it!!!
Tuesday, 2 July 2013
Albert Einstein Quote
“There are only two ways to live your life. One is as
though nothing is a miracle. The other is as though
everything is a miracle.”
Sunday, 24 March 2013
Make a Dishcloth Into a Rose
.
Marilyn's New Rose Pattern from a Spa Cloth/Dish Cloth©2009-11-30
.
~Marilyn Wallace~
.
 1..Knit a spa cloth/dish cloth.... I like to knit the Bee Stitch or the Rose Stitch http://www.knittingknonsense.com/beestitchcloth.html as there are little protusions that make it look like a cabbage rose.....This rose is a Spa Cloth so I used Bernat CottonTots...
.2..Fold Cloth..... check out how to do this from last year’s rose ....NB You don’t need to baste...http://rachelsknittingroom.blogspot.com/2008/12/dishcloth-pattern-day-countdown-to_21.html
.3. Get 3 or as many as you prefer very small elastics for holding back your hair...Crochet all around the elastic with a chain st.... till it is very full... In every chain st. crochet 5 treble crochets until the elastic is full.... The treble stitches make it look like long rose petals....
.

 4. Place scrunchies on the bottom part of the rose & adjust to make them look like rose petals.....Some I pointed downwards to look like a fully opened rose....You will have extra scrunchies around when needed..... Makes a nice double gift......
Tuesday, 25 September 2012
Bugs and Kisses

Materials:
4 mm short, circular needles (16 inches)(knit straight on them) or US#6
1 ball cotton yarn for a Dish
Cloth or
1 ball CottonTots for a soft, Spa
Cloth
Special
Instructions:
B5 means to do
border for 5 stitches (always keep the seed st. sequence)
How to do seed st. on odd number of stitches
& even number of st.
Cast on 48 st.
Row 01 seed st. across row
Row 02 seed st. across
row
Row 03 seed st. across row
Row 04 seed st. across row
Row 05 seed st. across row
Row 06 B5 k38 B5
Row 07 B5 p38 B5
Row 08 B5 k38 B5
Row 09 B5 p1 k2 p3 k2 p1 k2 p2 k4 p3 k4
p2 k4 p2 k4 p2 B5
Row 10 B5 k38 B5
Row 11 B5 p1 k2 p3 k2 p1 k2 p1 k6 p1 k6
p1 k4 p1 k6 p1 B5
Row 12 B5 k38 B5
Row 13 B5 p1 k2 p2 k2 p2 k2 p1 k2 p2 k2
p1 k2 p2 k2 p1 k2 p3 k2 p2 k2 p1 B5
Row 14 B5 k38 B5
Row 15 B5 p1 k2 p1 k2 p3 k2 p4 k2 p5 k2
p2 k2 p6 k2 p2 B5
Row 16 B5 k38 B5
Row 17 B5 p1 k4 p4 k2 p3 k2 p5 k2 p3 k4
p3 k2 p3 B5
Row 18 B5 k38 B5
Row 19 B5 p1 k2 p1 k2 p3 k2 p2 k2 p5 k2
p4 k2 p4 k2 p4 B5
Row 20 B5 k38 B5
Row 21 B5 p1 k2 p2 k2 p2 k2 p1 k2 p2 k2
p1 k2 p2 k2 p1 k2 p3 k2 p2 k2 p1 B5
Row 22 B5 k38 B5
Row 23 B5 p1 k2 p3 k2 p1 k2 p1 k6 p1 k6
p1 k4 p1 k6 p1 B5
Row 24 B5 k38 B5
Row 25 B5 p1 k2 p3 k2 p1 k2 p2 k4 p3 k4
p2 k4 p2 k4 p2 B5
Row 26 B5 k38 B5
Row 27 B5 p38 B5
Row 28 B5 k38 B5
Row 29 B5 p9 k2 p2 k2 p1 k2 p2 k3 p1 k4
p10 B5
Row 30 B5 k38 B5
Row 31 B5 p9 k6 p1 k2 p1 k4 p1 k2 p1 k2
p9 B5
Row 32 B5 k38 B5
Row 33 B5 p9 k2 p2 k2 p1 k3 p2 k2 p1 k2
p1 k2 p9 B5
Row 34 B5 k38 B5
Row 35 B5 p10 k4 p2 k3 p2 k2 p1 k4 p10
B5
Row 36 B5 k38 B5
Row 37 B5 p38 B5
Row 38 B5 k38 B5
Row 39 B5 p5 k5 p3 k3 p3 k5 p3 k5 p6 B5
Row 40 B5 k38 B5
Row 41 B5 p5 k6 p1 k5 p1 k7 p1 k7 p5 B5
Row 42 B5 k38 B5
Row 43 B5 p5 k2 p2 k2 p1 k2 p1 k2 p1 k2
p3 k2 p1 k2 p3 k2 p5 B5
Row 44 B5 k38 B5
Row 45 B5 p5 k2 p2 k2 p1 k2 p1 k2 p1 k2
p3 k2 p5 k2 p6 B5
Row 46 B5 k38 B5
Row 47 B5 p5 k5 p2 k2 p1 k2 p1 k2 p1 k4
p4 k2 p7 B5
Row 48 B5 k38 B5
Row 49 B5 p5 k2 p2 k2 p1 k2 p1 k2 p1 k2
p8 k2 p8 B5
Row 50 B5 k38 B5
Row 51 B5 p5 k2 p2 k2 p1 k2 p1 k2 p1 k2
p3 k2 p2 k2 p2 k2 p5 B5
Row 52 B5 k38 B5
Row 53 B5 p5 k6 p1 k2 p1 k2 p1 k7 p1 k7
p5 B5
Row 54 B5 k38 B5
Row 55 B5 p5 k5 p1 k3 p1 k2 p2 k5 p3 k5
p6 B5
Row 56 B5 k38 B5
Row 57 B5 p38 B5
Row 58 B5 k38 B5
Row 59 seed st. across row
Row 60 seed st.across row
Row 61 seed st. across row
Row 62 seed st. across row
Row 63 seed st. across row
Row 64 Cast off in seed st....
©Copy Right Protected Marilyn
Wallace 2012
http://marilynsknittingheavenonearth.blogspot.com/ (
REQUESTS My Speciality)
http://knittingheavenonearth.blogspot.com/ (free
patterns & crafts)
http://groups.yahoo.com/group/MarilynsKnittingHeavenOnEarth (CMKAL&
links,
How To Block Your Cloth or Bookmark
Letters
really need to be blocked well as they
will show so much better....
Place cloth
or bookmark on table & generously spray with water.... Take a tea towel
& place your hands all over the cloth to flatten it out so it lays nice
& even; then spray with water again......Let the water soak in for about 20
minutes... I now use the handle end of a wooden spoon....... & press down
all around the letters & surrounding area of the cloth...Using the end of a
knitting needle(this is your fine tuning) I then press around the letters &
inside the letters till the areas around the letters are quite flat...This
makes the letters pop.... I move it to where I am going to take the picture
& flatten some more just around the letters... Let the cloth dry overnight
as this makes the cloth look better too.... The yarn relaxes & the cloth
will pop even more.... hope this helps....& don't be afraid to spend time
doing this as the efforts are well worth it......
~Your
cloth or bookmark will look so much nicer for presenting...~
Anything you make
from my patterns may be sold. Do not
sell my patterns or give them away unless it is a free pattern… & then
& only then it may be given away & all my contact info must be
intact….Excludes companies & corporations…
Tuesday, 11 September 2012
Wall Art for Cayle & brother Wyatt

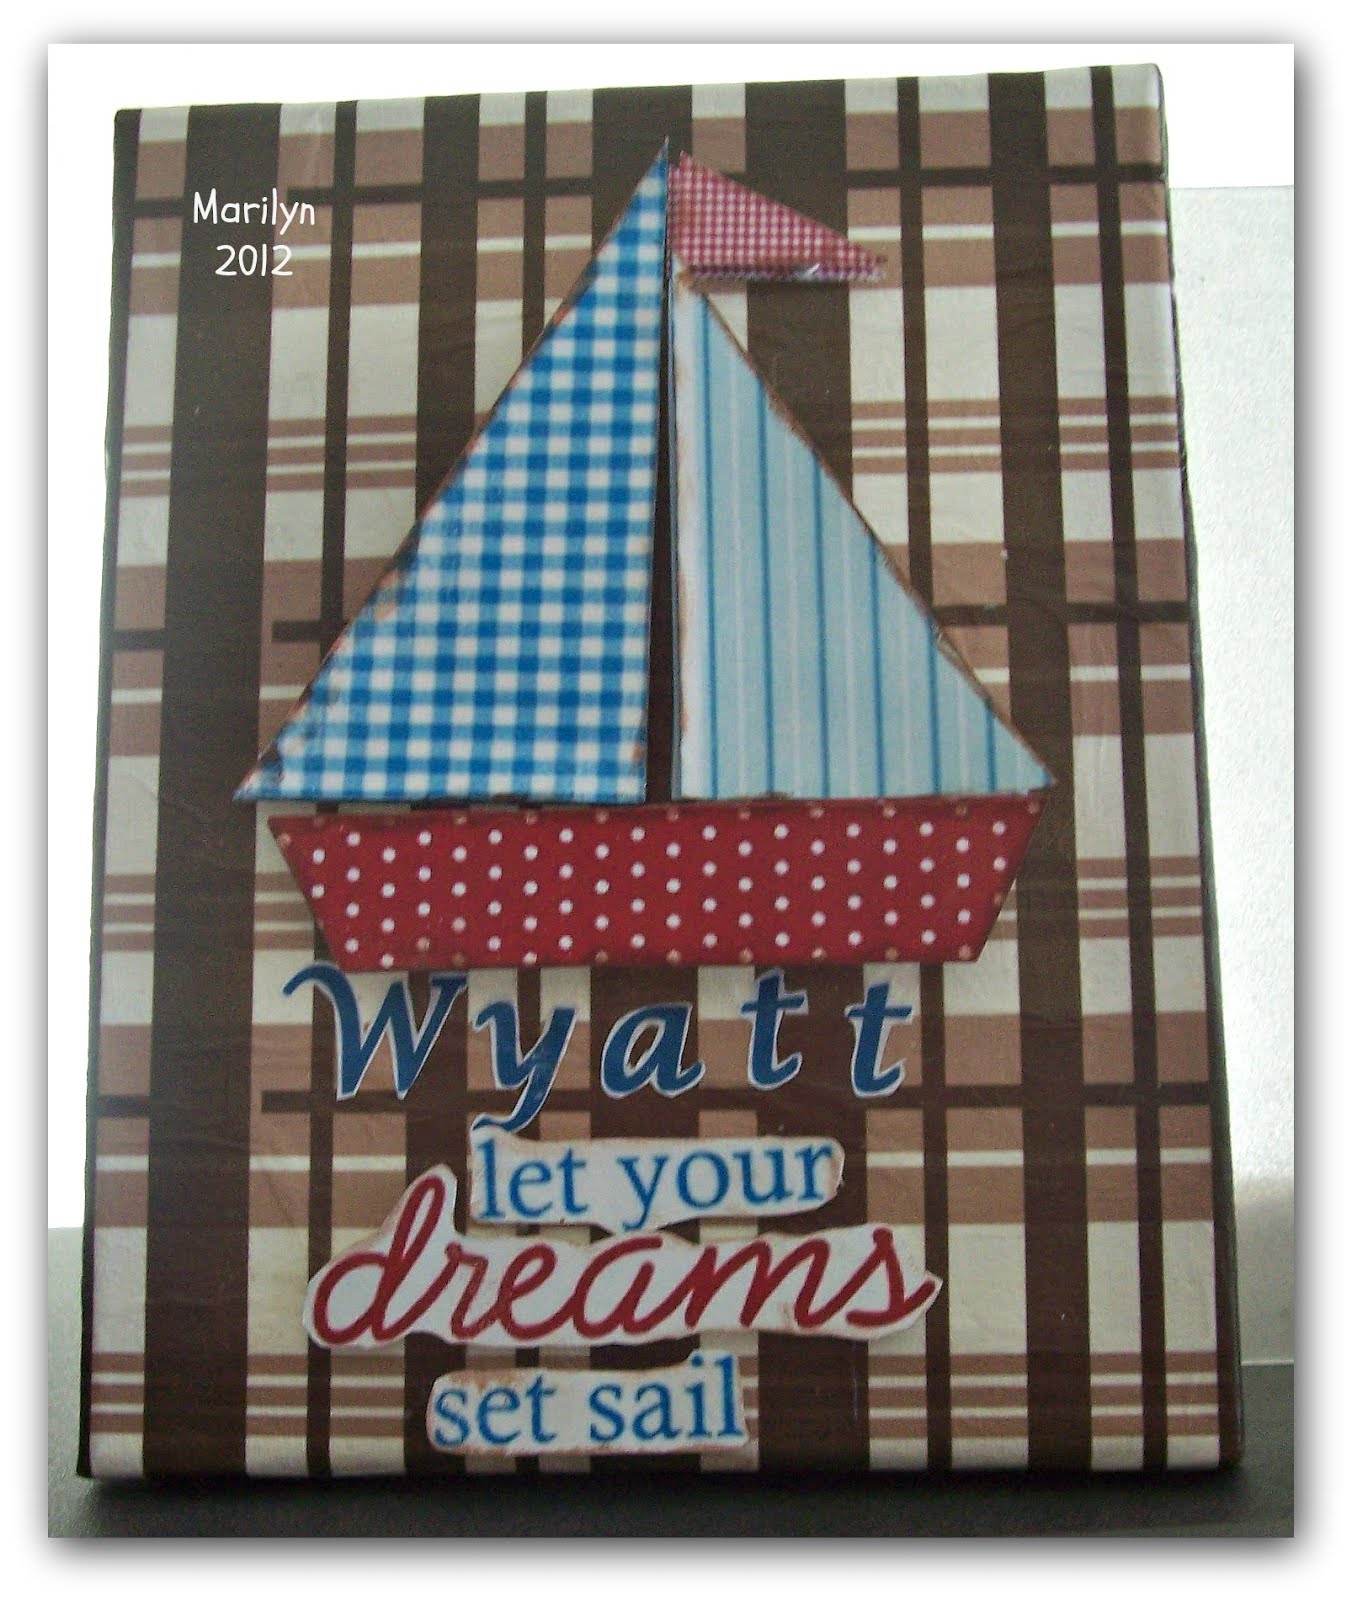

I made this wall art for 3 yr old grandson, Wyatt..... I wanted it to look masuline as I was used to making them for dgd's....I bought the art canvas & the tissue paper at The Dollar Tree.... I found the perfect pic at
& cut it out..... After printing on computer paper I decoupaged it down..... I then printed out the same graphic on cardstock & cut it out & used raised glue dots to adhere & to give it some dimension x3.....& placed it on top of the original sailboat picture.....I distressed the edges of the sailboat to give it some dimension. I cut out by hand "let your dreams set sail" & just postioned them with glue dots not doing the triple effect.... I printed Wyatt in Word Document in the colour blue & glued it straight on the picture....

Wednesday, 8 August 2012
Elvis (facial) ~ New test knit

Elvis
August 16, 2012 marks the 35 th anniversary of Elvis' death..... I dug out my old pattern from 2006 & reknit him......
Friday, 20 July 2012
Quinn Wall Art
 |
| ~ Quinn Wall Art~ Made this for our granddaughter for her baptism....... I used an artist's canvas bought at the Dollar Store......I printed out her name in pink in a Word Document enlarging it to fit the canvas.... I wanted to use a fancy font but I really wanted the word to be easily recognizable by a child....I cut each letter out leaving a small white border around each letter; it blends into the background... Glued the letters using mod pauge....I then painted the letters with Martha Stewart Glitter paint... I used curling ribbon which was tiny(had it on hand) & glued it on the sides & top... I punched out a border using my Martha Stewart paper punch & glued it onto the pink ribbon... I made the roses from computer paper from this site here..... This template & instructions are wonderful...I tied two tiny bows & glued them in two corners.... |
Subscribe to:
Posts (Atom)