Shark Cloth by Marilyn Wallace
use 4mm knitting needle
Cast on 40
Row 1: p1 k1 across row
Row 2: k1 p1 across row
row 3: p1 k1 across row
row 4: k1 p1 across row
row 5: p1 k1 across row
row 6 B5 (border 5), k30, B5
row 7: B5, p30, B5
row 8: B5, k30, B5
row 9: B5, p30, B5
row 10: B5, k30, B5
row 11: B5, p30, B5
row 12: B5, k30, B5
row 13: B5, p30, B5
row 14: B5, k30, B5
row 15: B5, p17, k1, p12, B5
row 16: B5, k11, p2, k17, B5
row 17: B5, p17, k2, p11, B5
row 18: B5, k11, p2, k17, B5
row 19: B5, p4, k1, p7, k2, p3, k2, p11, B5
row 20: B5, k8, p12, k4, p2, k4, B5
row 21: B5, p5, k1, p3, k17, p4, B5
row 22: B5, k3, p22, k5, B5
row 23: B5, p5, k21, p4, B5
row 24: B5, k6, p13, k2, p1, k2, p2, k4, B5
row 25: B5, p3, k2, p8, k9, p8, B5
row 26: B5, k11, p5, k10, p2, k2, B5
row 27: B5, p1, k2, p11, k4, p12, B5
row 28: B5, k12, p3, k15, B5
row 29: B5, p15, k2, p13, B5
row 30: B5, k13, p2, k15, B5
row 31: B5, p15, k1, p14, B5
row 32: B5, k14, p1, k15, B5
row 33: B5, p30, B5
row 34: B5, k30, B5
row 35: B5, p30, B5
row 36: B5, k30, B5
row 37: B5, p30, B5
row 38: B5, k30, B5
row 39: B5, p30, B5
row 40: B5, k30, B5
row 41: B5, p30, B5
row 42: k1, p1 across
row 43: p1, k1 across
row 44: k1, p1 across
row 45: p1, k1 across
row 46: k1, p1 across
row 47: BO
Thursday 30 December 2010
Friday 24 December 2010
Wreath Made with Coffee Filters

Here is the link I used from Martha Stewart to make my coffee filter wreaths......The only difference is that I glued the two coffee filters together with a dab of glue from my low heat glue gun.... I didn't want the filters to come apart so I took this extra step..... This hardly took any time at all & I love the ruffles......
Saturday 18 December 2010
Christmas Balls with Secret Ingredient
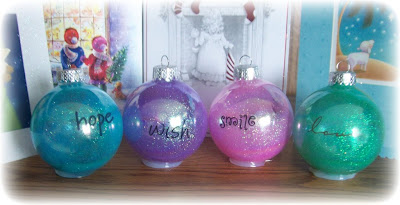 I created a stand for my Christmas Ornaments by placing a large circle of glue on my glue pad & placing the ball in the circle of glue..... When it dries well, the ball will remove easily with the glue intact & voila you have a bottom that allows the ball to sit perfectly.... I bought little vinyl sayings at Walmart & placed them on.....Perfect little homemade gifts......Wouldn't they look pretty as place settings.......
http://www.youtube.com/user/sunnigrrl30?feature=mhum#p/f/85/lTvq2GPkm9U
The secret ingredient is liquid Pledge floor shine .....It helps if two people work this craft or be very prepared if doing by yourself..... I had all the caps off & the bottles opened before starting.... Pour the liquid floor shine into the clear ball & swirl around... Dump all the liquid back into the original bottle.... Quickly pour in the Martha Stewart fine glitter using a fair amount.... Make sure the entire inside of the ball is covered with the glitter...The secret here is to work quickly before the floor shine dries....Place cap back on your glitter ball....I used my 40% off coupon at Michael's to buy the Martha Stewart Fine Iridescent Glitter....I bought some little stickers from Walmart that say things like, Smile, Wonder, Love etc. & they are just adorable......
I bought my clear balls in Michaels at the Cambridge store as they were on for less than half price & they had a large supply.....
Monday 13 December 2010
Lighted Christmas Gift
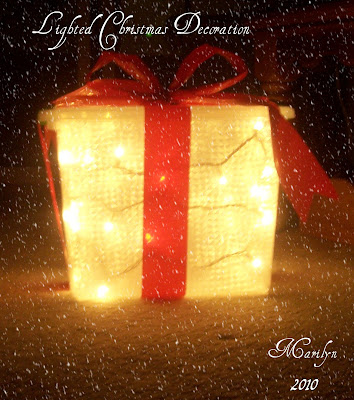
Materials Needed
Clear plastic tote ( I used 11"x14")
Strand of clear Christmas Lights(25)
Red Plastic Outdoor Ribbon(Canadian Tire)
Frosted Contact Paper(Home Depot)
Take your tote(on the back at the bottom) & cut an x opening just large enough so the light plug can stick out.....Just push the plug out & leave the lights inside the tote...
Cut the frosted contact paper....to fit your side of the tote...Overlap the corners.... I found it easier to cut each panel separately........The frosted paper makes it look nicer imho... You can't see the light strand as well & it creates a warm glow....Stick paper on all sides on the outside of the tote......
We used heavy clear tape & taped the lights to the insides of the tote walls... This would be optional.....
Place lid on...
Tie the plastic ribbon all around the tote & a bow on the top....... This can be used outdoors as the tote protects the lights & the ribbon is plastic......so it is very weather proof. Our daughter liked hers so well she uses it in her front hallway.......& it looks charming inside as well.....
Saturday 4 December 2010
Snowman Candle InstructionsFree Patterm
Instructions are sent to you on how to make your own Snowman Candle
Make them for your own craft sale.... Mine were a best seller!!!
People were so intrigued by them
Sunday 31 October 2010
Cryptic Message KAL with Halloween Theme

UR BOOTFL©
Designed by Marilyn Wallace Sept. 23, 2010
marilynw@rogers.com
Materials:
4 mm short, circular needles (16 inches)(knit straight on them) or US#6
1 ball cotton yarn for a Dish Cloth or
1 ball CottonTots for a soft, Spa Cloth
Special Instructions:
B5 means to do border for 5 stitches (always keep the seed st. sequence)
How to do seed st. on odd number of stitches & even number of st.
http://knitting.about.com/od/stitchglossary/g/seedstitch.htm
Cast on 46 st.
Row 01 seed st. across row
Row 02 seed st. across row
Row 03 seed st. across row
Row 04 seed st. across row
Row 05 seed st. across row
Row 06 B5 k36 B5
Row 07 B5 p36 B5
Row 08 B5 k36 B5
Row 09 B5 p1 k4 p3 k3 p3 k3 p4 k2 p3 k2 p3 k4 p1 B5
Row 10 B5 k36 B5
Row 11 B5 p1 k5 p1 k5 p1 k5 p3 k2 p3 k2 p3 k4 p1 B5
Row 12 B5 k36 B5
Row 13 B5 p1 k2 p1 k2 p1 k2 p1 k2 p1 k2 p1 k2 p3 k2 p3 k2 p3 k2 p3 B5
Row 14 B5 k36 B5
Row 15 B5 p1 k2 p1 k2 p1 k2 p1 k2 p1 k2 p1 k2 p3 k2 p3 k2 p3 k2 p3 B5
Row 16 B5 k36 B5
Row 17 B5 p1 k4 p2 k2 p1 k2 p1 k2 p1 k2 p3 k2 p3 k4 p1 k2 p3 B5
Row 18 B5 k36 B5
Row 19 B5 p1 k2 p1 k2 p1 k2 p1 k2 p1 k2 p1 k2 p3 k2 p3 k2 p3 k2 p3 B5
Row 20 B5 k36 B5
Row 21 B5 p1 k2 p1 k2 p1 k2 p1 k2 p1 k2 p1 k2 p3 k2 p3 k2 p3 k2 p3 B5
Row 22 B5 k36 B5
Row 23 B5 p1 k5 p1 k5 p1 k5 p1 k6 p1 k4 p1 k2 p3 B5
Row 24 B5 k36 B5
Row 25 B5 p1 k4 p3 k3 p3 k3 p2 k6 p1 k4 p1 k2 p3 B5
Row 26 B5 k36 B5
Row 27 B5 p36 B5
Row 28 B5 k36 B5
Row 29 B5 p11 k5 p3 k2 p3 k2 p10 B5
Row 30 B5 k36 B5
Row 31 B5 p10 k7 p2 k2 p3 k2 p10 B5
Row 32 B5 k36 B5
Row 33 B5 p10 k2 p3 k2 p2 k2 p3 k2 p10 B5
Row 34 B5 k36 B5
Row 35 B5 p10 k2 p3 k2 p2 k2 p3 k2 p10 B5
Row 36 B5 k36 B5
Row 37 B5 p10 k2 p3 k2 p2 k6 p11 B5
Row 38 B5 k36 B5
Row 39 B5 p10 k2 p3 k2 p2 k2 p3 k2 p10 B5
Row 40 B5 k36 B5
Row 41 B5 p10 k2 p3 k2 p2 k2 p3 k2 p10 B5
Row 42 B5 k36 B5
Row 43 B5 p10 k2 p3 k2 p2 k7 p10 B5
Row 44 B5 k36 B5
Row 45 B5 p10 k2 p3 k2 p2 k6 p11 B5
Row 46 B5 k36 B5
Row 47 B5 p36 B5
Row 48 B5 k36 B5
Row 49 seed st. across row
Row 50 seed st. across row
Row 51 seed st. across row
Row 52 seed st. across row
Row 53 seed st. across row
Row 54 Cast off….
©Copy Right Protected Marilyn Wallace 2010
http://marilynsknit tingheavenoneart h.blogspot. com/ (KNIT YOUR NAME)
Friday 22 October 2010

Halloween Witch©
Designed by Marilyn Wallace October 18, 2006
marilynw@rogers.com
Materials:
4 mm short, circular needles (16 inches)(knit straight on them) or US#6
1 ball cotton yarn for a Dish Cloth or
1 ball CottonTots for a soft, Spa Cloth
Special Instructions:
B5 means to do border for 5 stitches (always keep the seed st. sequence)
How to do seed st. on odd number of stitches & even number of st.
http://knitting.about.com/od/stitchglossary/g/seedstitch.htm
Cast on 40 st.
Row 01 seed st. across row
Row 02 seed st. across row
Row 03 seed st. across row
Row 04 seed st. across row
Row 05 seed st. across row
Row 06 B5 k12 p13 k5 B5
Row 07 B5 p5 k13 p12 B5
Row 08 B5 k6 p1 k5 p13 k5 B5
Row 09 B5 p7 k11 p5 k1 p6 B5
Row 10 B5 k6 p3 k2 p12 k7 B5
Row 11 B5 p7 k16 p7 B5
Row 12 B5 k7 p18 k5 B5
Row 13 B5 p5 k17 p8 B5
Row 14 B5 k8 p16 k6 B5
Row 15 B5 p7 k15 p2 k1 p5 B5
Row 16 B5 k5 p17 k8 B5
Row 17 B5 p9 k16 p5 B5
Row 18 B5 k6 p15 k9 B5
Row 19 B5 p9 k12 p9 B5
Row 20 B5 k10 p11 k9 B5
Row 21 B5 p9 k12 p9 B5
Row 22 B5 k9 p12 k9 B5
Row 23 B5 p9 k13 p8 B5
Row 24 B5 k7 p14 k9 B5
Row 25 B5 p9 k9 p1 k5 p6 B5
Row 26 B5 k5 p3 k4 p10 k8 B5
Row 27 B5 p7 k9 p14 B5
Row 28 B5 k14 p9 k7 B5
Row 29 B5 p6 k9 p15 B5
Row 30 B5 k16 p8 k6 B5
Row 31 B5 p5 k9 p16 B5
Row 32 B5 k17 p8 k5 B5
Row 33 B5 p5 k7 p18 B5
Row 34 B5 k20 p5 k5 B5
Row 35 B5 p5 k4 p21 B5
Row 36 B5 k22 p3 k5 B5
Row 37 B5 p4 k4 p22 B5
Row 38 B5 k23 p3 k4 B5
Row 39 B5 p4 k3 p23 B5
Row 40 B5 k23 p3 k4 B5
Row 41 seed st. across row
Row 42 seed st. across row
Row 43 seed st. across row
Row 44 seed st. across row
Row 45 seed st. across row
Row 46 Cast off…
©Copy Right Protected Marilyn Wallace 2006
Check out on my free blog how I do my blocking….. Blocking makes a big difference….
http://knittingheavenonearth.blogspot.com/2009/03/here-is-what-i-do-to-block-my-cloths.html
Anything you make from my patterns may be sold. Do not sell my patterns or give them away unless it is a free pattern… & then & only then it may be given away & all my contact info must be intact….Excludes companies & corporations…
Sunday 10 October 2010
Pumpkin Lights for Our Grandchildren Made from a Small Canning Jar
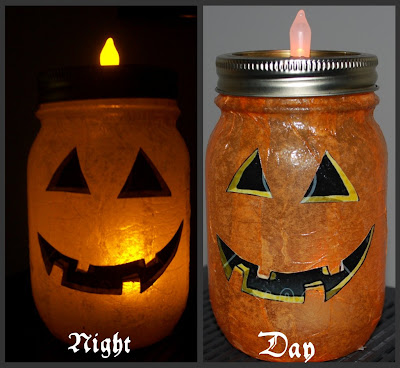 designed by Marilyn Wallace~October 2010 copyrighted
First of all I made one with a big mayo jar & I just didn't like it.... I wanted to make it smaller so I looked around & saw my small canning jars... Perfecto!!!
I bought some orange tissue paper & cut them into about 2" strips...long enough so the bottom of the jar can be covered...Cut on the folds of the tissue paper. I used a light decoupage glue(Anitas) & started in small areas to apply it...Just water down thick decoupage glue if necessary....Using just one layer of the tissue paper, place the tissue strips straight up & down; use your sponge brush to apply gently as the tissue is very fragile at this point.....& it will tear off if you use your fingers.... Pat the tissue down gently too with the brush......
Here is the method I used to make the appearance of creases that pumpkins have; overlap the tissue for the width of the groove you want...... The double tissue covering these sections are darker & simulate the creases a pumpkin has...
You can paint a Halloween face on but I googled cute pumpkin face & printed off the face....I cut the eyes & mouth out from the picture & decoupaged them on... I used the back of the canning jar for the face...Cut out two faces if you wish to have a 2 sided pumpkin....You could invert the mouth to make the other side a sad face..... Brush on a coat of High Gloss decoupage....when tissue is completely dry on the jar.... I used Aleenes.
I placed a battery tea light inside so it would glow in the dark.... when turned on...I glued my canning jar lid & cap together & punched a hole in the lid big enough so the tea light flame only could fit through.... I glued the tea light to the cap as well..... This little tealight flame gives the appearance of the stem of the pumpkin & it lights up which gives it extra charm...
Happy Halloween~Marilyn
Friday 12 March 2010
Wednesday 3 March 2010
Shadow Boxes for Our Grandchildren~Olympics 2010
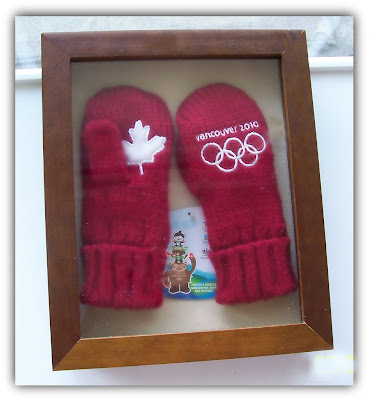 I bought three pair of the Olympic mittens with the Vancouver 2010 logo & our Canadian Maple Leaf on them....that are so famous.... I have placed them each in a shadow box to keep as a memento......Our granddaughter is 10 almost 11 & will remember them as she had a pair to wear as well.... Our two grandsons who are 2 & 1 will not remember them......
I bought the shadow boxes at Michaels this week.....
Tuesday 9 February 2010
Repair made to my Toile Duvet Cover


Unfortunately I spilt some dark finger nail polish on my duvet cover... Nothing would take it out after many attempts.....I decided I would cover it instead.... My duvet cover is a creamy white so I took some Warm White Acrylic Paint & mixed it with Light Buttermilk... When mixed I added some Fabric Paint Medium & blended again.... I then took a brush & touched the spots that needed covering.... I smudged it with my finger as well.....& I can barely find the spot.... No one would ever know the difference.... I love my Duvet Cover & was heartsick to think I ruined it but alas the day was saved......
Friday 1 January 2010
Wreath Made From a Paper Back Book
 Here is a wreath I made with Reader's Digest Condensed Books..... The pages are a really different shade than just plain white.... They have a peachy tone to them so I thought it would look perfect in our bedroom.... It blends in with the curtains nicely.....
 Here is the link on how to make the wreath from a paper back book....... I think this is just a stunning wreath.......It looks so beautiful hung on your wall..... Of course I did mine a little differently than Lindsay but it is the same with everything, you do it your way.... I made a very big one which just looks so beautiful & this one is a smaller wreath.....Just remember that whatever form you pick the wreath will double in size..... Patience is needed for this project as it is so time consuming....I found filling in at the end makes all the difference in the world but I consistently kept the S shape with the paper....The dark hue in the centre is just the shadow effect of the printed word.......It depends on the angle you look at it.....It is a wreath you can hang up all year round or for Christmas you can spray it with glue & sprinkle on Diamond Dust.....
http://www.livingwithlindsay.com/2009/11/librarians-please-avert-your-eyes.html
Subscribe to:
Posts (Atom)

